Beautiful Card Designs Made Easy

February 07, 2017

Tuesday Tutorial - Deco Lux

Hi Everybody,

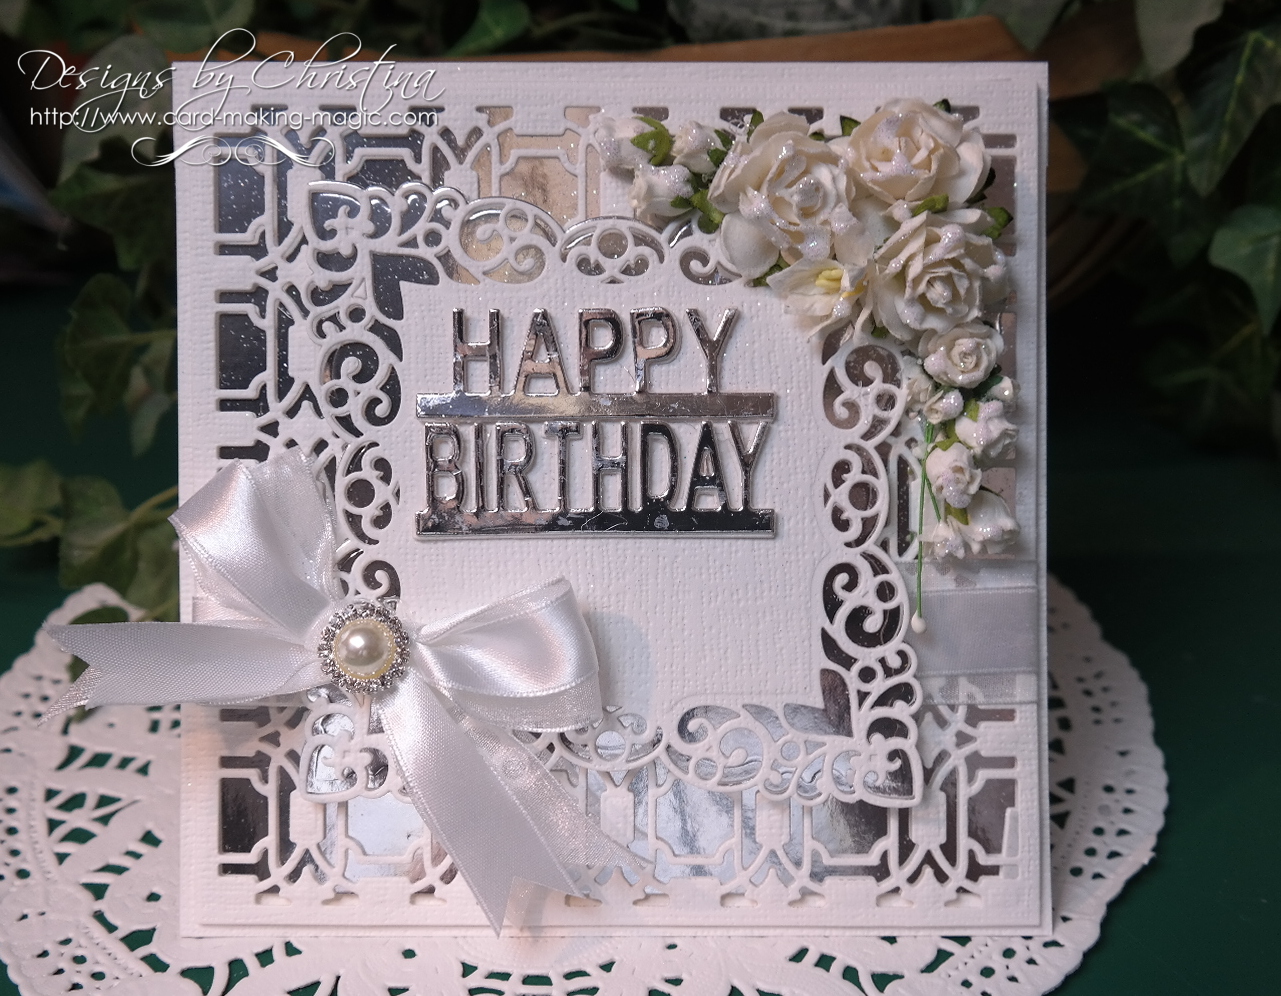
Today we have a card in silver and white that is really easy to make. 
It's just layers with foam between them and it gives a really dramatic effect . 
 The card is just over 6" and the addition of the flowers makes it suitable for a wedding card too. 
Spellbinders Supplies:
Other Supplies:

With the outer edge die cut two and create a hinged card 
With both dies together cut a  patterned panel in white
Hand cut a silver mirror card layer to sit between them
Add the filigree piece to the silver mirror card with foam between and then wrap with organza and satin ribbon
Tie a layered bow using both ribbons together
With #5 from the plain Labels Forty Two cut one layer in silver
With #4 from the Decorative Elements cut one in white card
Layer these two together with foam in between for dimension
With the Border Sentiments cut two in white card and one  in silver and layer them together for extra strength

Add the smaller panel on the top of the base layers
Add the sentiments to the card and decorate with pretty flowers
Dot with glue and sprinkle with glitter for a really lovely effect
Add the bow and the shiny dazzler 

Alter the sentiment and this would make a lovely Wedding or Silver wedding card

More tomorrow ...

Hugs xx

February 06, 2017

Time flies ...

Hi everybody,

I can't believe how quickly time goes by and I have another birthday looming next month. 

It is also nearly a year since I joined the Craft Stash Design Team

This is one from the first batch of cards that I made for them.

I seem to have come along way since then and my videos are now a regular part of their website.

They have an area named Inspiration Gallery  and that is where you will find a lot of my work along with the other designers on the team.  It has been a really good journey so far and you all seem to enjoy the magazine freebies that I now cover.

There are some wonderful free gifts coming up in the future so keep a look out for your favorite margarine ( oooops ) magazine and be sure to get it.  

The videos about the freebies always go "Live" the week before they are on sale in the shops so it gives you a sneaky peak of what is coming and you can then decide if this is one that you would like.

Thanks for watching my vidoes and for continuing to visit my blog and leave your comments both here and on YouTube 

More tomorrow ...

Hugs xx.

February 05, 2017

Pop Up Happy Birthday

Hi Everybody,

This card looks intricate to make but I promise you that it is not.  I even have a video that was made a long time ago showing you the basic steps to take and then you can dress it up any way you wish.
 The Easy Stepper card needs no measuring either so I hope you will give this a try. 
This is a more up to date look to my card and I really like this one
For this card I have used cream for the base and then Labels Eight to cut the filigree panel in gold glitter paper from  Craft Stash

The  Happy Birthday Pop Up  is a little die that cuts out the words and then all I have done is glue along the edges and added to one of the steps. There are other ways that you can use the die but this just suited my purpose completely

My floral arrangement is as always from Wild orchid Crafts   and into the display I have added a lovely Hatpin. The lace  and the bead flower along the bottom are also from WOC

This is a card that looks so much better in the hand

More tomorrow ...

Hugs xx


February 04, 2017

Todays Card Winner ...

Hi Everybody,

It's a beautiful day here today and I really hope it stays this way as I have lots of things to do. Later today Vickie Griff and I are taking Isabella out to tea at her Daddy's restaurant and I am really looking forward to it.

Griff and I were also in  Jamie's  last night and I had the most amazing  meal.
 I am pleased to say that he is doing really well and if you wanted to dine in there on Saturdays you would need to book as the restaurant is full for the next two Saturdays.

Anyway ... the draw for the butterfly card has been done and the name this week is yours ...

Iris Harborne
please can you email me with your postal address to 
christina@card-making-magic.com
and the card will be on its way to you straight away.

I hope you will like it when it arrives and please let me know when  it does.

More tomorrow ...

Hugs xx

February 03, 2017

Friday Freebie 004/17 - Butterfly Parchment

Hi Everybody,

This is another card that was created on video in the film 
It is very easy to do but gives a lovely effect that can be altered with the colour of card that you add under it

The folder that I used is from Crafters Companion but I have had it a while now and I don't know if it is still available

Would you like to own this card ? Then all you need to do is leave me a comment at then end of the post.

 From those comments a name will be chosen at random and the winner announced in tomorrows blog post 

You will have 72 hours to claim the card  and it doesn't matter if you have won one in the past.

I will send the card wherever you live and you don't need to have a blog to enter.

More tomorrow...

Hugs xx

February 02, 2017

Papercraft Essentials 143 - Fairy Wishes

Hi Everybody,

The Papercrafts Essentials 143 will be on sale in selected supermarkets and craft shops on the 9th February 

With if comes the lovely free stamp set called  Fairy Wishes and the video is a sneaky peak at what you will get


There are two silhouette fairies in this set with 
plenty of sentiments and little items for you to personalise the card


I have given you some ideas in the video and there will be many more in the magazine.  

It also has the embossing folder and you can create some lovely effects simply using that.

You can make it as simple or as intricate as you wish.

But the free gifts that I show you from all the magazines that I cover are of good quality and if looked after will last you a long time.  All you need to do is have fun playing with them and of course enjoying the magazine of your choice at the same time

More tomorrow ...

Hugs xx

February 01, 2017

Water Colour Wednesday - Pink Tulips

Hi Everybody,

A really simple card for todays water colour but one that I quite like.

This is an image from Just Inklined and is one I have done many times before.

 It is on the CD The Next Big Thing and I always say that it is sad that this CD is no longer available

So if you have it treasure it as there is so much on this disc. And if you do manage to find it any where snap it up.

This is just a simple coloured image layered onto some spotty card and then wrapped with ribbon.

I added a pearl flourish around the cup and some larger pearls in the top corner

You could add any sentiment to this that you liked and it would suit any occasion.

More tomorrow ...

Hugs xx


January 31, 2017

Tuesday Tutorial - Oval Floral

Hi Everybody,

Another quick and easy card to make today and this uses the beautiful oval die from Spellbinders. I have chosen the lovely combination of lilac and white for my as I always think this is a fresh colour scheme that can be used for so many occasions.
Spellbinders Supplies:
Other Supplies:
With white card cut two pieces from die #7 Matting Basics A and Create a Hinged Card
Hand cut a slightly smaller layer in lilac card to leave a narrow border around the edge
Hand cut another white layer that is again slightly smaller than the lilac and emboss this piece to add texture to the layer
(Please remember that die =1 is always the smallest)
With Oval Floral dies #2 & 3 cut three frames and glue them all together for extra strength
Cut the sentiment twice in white and once in Silver glitter card and glue together


Add the embossed layer to the lilac card and wrap with lace and ribbon before adding to the base card
Add the frame in the position you want it and lay the sentiment across the frame.
I have used tiny pieces of foam tape on the outer letters to make it lie evenly across the frame.
Arrange the flowers as you like them and add in a little bow 
Dot the flowers with glue and sprinkle on the glitter.
Allow to dry and then the glitter will lie flat on the petals.
Arrange lilac pearls into the Ovals centre in a random pattern

A card for any occasion ... just alter the sentiment

More tomorrow ...

Hugs xx


January 30, 2017

Coffee and Cream

Hi Everybody

Todays card is using some really pretty card in cream from  PMD  and then using inks to colour the rest as a highlight to bring out the features in the lace.

The card is a 5x7 top folded card as this is my favorite way to make any cards that I do.

Having the fold at the top helps the card to stand better especially if you add as many embellishments to it as I do

So I have mixed old dies with new ones here and I really love the new Graceful Floral Lace from Becca Feeken.

For this card I have used Distress Ink Ground Espresso and inked through the die before removing the card and it gives you this lovely pattern on your lace.

It is so pretty and a wonderful addition to any feminine cards.

The other is the Botanical Heart Pair  and this I have cut three times and glued them together.

This is another favorite trick of mine as it gives strength and depth to the die cut and makes it stand out on the card. Try it ... it works wonders

The card has been wrapped in ribbon and the layered with a pearl strip and then the bow added to the top.

The Happy Birthday Sentiment has also been cut several times and glued together for effect, and is also a new die from Spellbinders.

More tomorrow ...

Hugs xx


January 29, 2017

Ruby Update ...

Hi Everyone,

Well here I am again and I am now five months old and I still look like butter wouldn't melt in my mouth.

I am waiting here for a treat that my mum has in her hand and it's sausages and I looove sausages !

I have had quite a few adventures since I was last here and one of them is that I now go to Puppy Training classes every week

I am learning to be a good puppy but sometimes it is hard especially because Dougal ... my very best friend ... is also there and all we want to do is play.
We have so much fun together and the other day my mum and Dougals mum Vickie, took us in Stanley Park.

We ran around and played in all the leaves and mud we could find and we were both really dirty

But I stood on something that I though was grass and it wasn't

It was what my mum called the algae on the lake and I fell in ....  I soon found out that I could swim

I had my lovely blue jacket on and my mum thought it might drag me under and she was calling my name from the side.

I tried to swim towards her but there was some wood in my way and when I touched the wood it moved so I had to take the long route and swim around it.

My mum was hopping about on the waters side and Dougals mum kept calling "Don't panic Mum ... Don't panic... " to my mum.

Coz of course my human mum is Vickies mum too.

As soon as I got close to my mum she scooped me out of the water and hugged me really close.. I had to take the jacket off and she put me in her coat to keep me  warm.

I was praised for swimming so I might just have to try that again some day ... but when the weather is warmer.  And I was really clean of all the mud when she got me out.

Once I warmed up I wanted to go and play with Dougal again and after the panic my mum and Vickie ended up laughing about her trying to get me out the water ... she can't swim as well as me !!

More next time ...

Hugs xx


January 28, 2017

Card Winner ...

Hi Everybody,

Late post today as I was busy this morning taking my daughter to collect her new car and she is one happy girl. I took Ruby with me of course and we had a lovely ride out, and she is so good in a car.
She has a story to tell you tomorrow so I hope you will join me again then.

Anyway on to the winner of the pink chalk card. The name drawn this week is you

Linda Batson
So if you could email me please
christina@card-making-magic.com
I will get the card in the post to you straight away

More tomorrow ...

Hugs xx


January 27, 2017

Friday Freebie 003/17 - Pink Chalk

Hi Everybody,

Todays card was featured in a video a little while ago using chalks and the effect is a soft and gentle look

The video ... Create a Chalk Background  .. uses some pastel chalks that I have in my stash and they are something that was really popular a few years ago.

It seems to have gone out of favor and so I thought it time that I got mine out again and use them.

I bet you are like me in buying things,  using them for a while and then something else takes your eye and you move on,  and forget about the other stuff you have

Well if you have chalks then give them an airing and you are sure to like the effect.

But don't forget that can of cheap hairspray to spritz the card as that will set the chalks and stop them rubbing off the card again and spoiling the look.

Now if this is a card that you would like then all you have to do is leave me a comment and come back tomorrow and check if it is your name that is listed as the winner. You have 72 hours in which to claim the card and then you will be too late

I am happy to send the card anywhere you live and you don't need to have a blog of your own either
I add a card every Friday so just add your name and you never know YOU could be the winner

More tomorrow ...

Hugs xx

January 26, 2017

New Collection from Craft Stash

Hi Everybody,

Today sees the launch of more new dies from Craft Stash and this is the Daisy Chain Collection. I have four new videos showing how I have used this set and they are all ready for you to view.

The first one is to create a background with the stamp set

I have used a favourite trick of muting the background with parchment for a subtle look

The video is Daisy Stamped Background  and will show you how I made this card.

This circular card is created with the dies cutting white card and some colour added for effect.

I love the sentiment on this and it is part of the stamp set .."Goodbye Tension - Hello Pension " a good one to send to many of your retiring friends

For this card I have used the Daisy Chain Border   which gives a really pretty look to the edges of the card.

I have used the glitter card that I featured in a video a few weeks ago and it is available from Craft Stash

And with this card I used the embossing folder to create a Letterpress look for the background to my card

Altogether this is really versatile collection and you will be bale to make so many different looks for any occasion.

More tomorrow ...

Hugs xx

January 25, 2017

Water Colour Wednesday-Tropical Blooms

Hi Everybody,

This little stamp set was free with a magazine and it was featured in the video

It is a really versatile stamp set and as a free gift it was such a bonus as there are so many on the A4 sheet

For this card I stamped the flower and then masked it off and add the image again.

I used other parts from the set to add more interest around my flowers and then I painted them with Gansai Tambi watercolours.

I added some white dots to the flowers and that brought them more to the forefront of my picture

Dotted with sequins as a finishing touch and the card is ready to send. Vary the sentiment to suit the occasion  and the recipient

You will find more of my ideas using this stamp set in this months
Die Cutting Essentials 20 magazine on sale on the 26th january 17.

More tomorrow ...

Hugs xx

January 24, 2017

Tuesday Tutorial - Flowers & Lace

Hi Everybody,

For todays card I am using some old and new dies together and creating a really pretty design with only card elements on it. I like to add lace and flowers to my creations and with these dies I can add both and it doesnt cost the earth. 
And with dies I can re create the whole look time after time just altering the colours in the card or the inks I use.
Spellbinders Supplies:
Other Supplies:
Instructions:

With die #7 from the matting basics cut two pieces in cream and create a hinged card
Hand cut a slightly smaller layer in pink to leave a narrow border around the edge
Hand cut another slightly smaller layer in cream and emboss this in the folder
Glue the two hand cut layers together
Cut one layer in cream and hand cut a layer in pink to fit beneath the die cut
Glue these two together just around the edges then add foam tape at the back
Select the florals that you wish to use and cut them in cream
Ink through the die before you remove the card. Abandoned Coral for the flowers and Mowed Lawn for the leaves
Cut one strip of the Graceful Floral Lace and use small foam pads in strategic places to the back of the die cut so that they cannot be seen from the front
(I love this die and it looks really pretty if you ink through it before removing the card)
Add the Two Way Street panel to the embossed layers and wrap the lace strip around them all.
Add small foam pads to the florals that you cut and arrange them and the leaves onto your card as you like.
Cut the sentiment of your choice form the Phrases several times and glue them together for strength.
Add to the card front as you like .
I then added Glossy Accents and Glitter to my die cuts 
Vary the florals, sentiments, arrangement and the colours for another look to your card 

More tomorrow ...

Hugs xx